UIButton *myButton = [UIButton buttonWithType:UIButtonTypeRoundedRect];
myButton.frame = CGRectMake(20, 20, 200, 44); // position in the parent view and set the size of the button
[myButton setTitle:@"Click Me!" forState:UIControlStateNormal];
// add targets and actions
[myButton addTarget:self action:@selector(buttonClicked:) forControlEvents:UIControlEventTouchUpInside];
// add to a view
[superView addSubview:myButton];
Thứ Ba, 12 tháng 10, 2010
Thứ Năm, 7 tháng 10, 2010
How to Integrate In-App Purchases
From: http://www.splashnology.com/blog/iphone/360.html
General Information
There are three types of In-App Purchases:
- Consumables
- Subscriptions
Non-Consumables
A consumable purchase may be effected more than once. For example, if you've ever played the game Eliminate you know that you need to
restore your «energy» from time to time, when its level goes too low. The catch is that a player can either wait for three hours until the energy is replenished naturally or buy it for real money.
A non-consumable purchase can be effected only
once. This kind of purchase is useful for unlocking new themes, additional levels, and so on.
A subscription can be used, as you might have guessed, for subscribing to some service. For example, you can make an iPhone application for a Web service with a Premium account that is activated, say, for a month or for a year.
You can implement In-App Purchases using either of the following two models:
- Built-in model
- Server model
The built-in model lets the user unlock some featur
es. Usually it means that those features must already be present in the application, so that StoreKit only handles the payment for the feature. Generally, StoreKit lets you check whether the purchase was successfully effected.
The server model is more flexible and involves three entities: an iPhone application, the Apple server and our (that is the developer's) server. All new features are stored on our server, so we don't have to update the application whenever we add some new features or new software products. The model works as follows:
- The iPhone application requests a list of products from its server.
- The iPhone application displays the new products to the user.
- The user buys something — or doesn't. :)
- The iPhone application requests the purchase from the Apple server via StoreKit.
- StoreKit delivers the reply.
- The iPhone application forwards the reply to our
- The reply is re-checked — it must be always verified whether the reply was actually received from Apple's server.
- If everything is fine, the iPhone application downloads the new product from our server.
server.
This article is about the built-in model.
Implementation
To demonstrate how the built-in model works I'll be using a test case, AppPurchasesExample — a simple iPhone application that has three windows. The main window, which the user can see by default, contains information about two other windows, which can be unlocked only if the user agrees to pay for that.
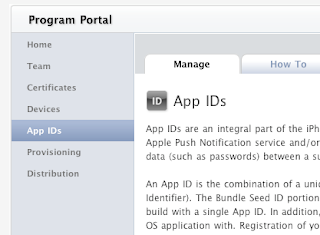
Step 1. Creating App ID
Go to the iPhone Developer Program Portal and click on App ID
Click on New App ID (in the screen's top right corner), then enter the information on your application. I've filled in the form as follows:


Apple recommends using the Reverse DNS naming convention to make a Bundle Identifier, which ensures that your identifier is unique — that might save you a lot of trouble when publishing your application. It is extremely important that you do not use the asterisk (*) in the Bundle Identifier! If you fail to follow the advice and enter com.wordpress.indiedevelop.* or something like that, In-App Purchases won't work at all!
Then you need to enable In-App Purchases for your App ID. In the App IDs list, click on your Bundle Identifier's Configure button. When a Configure App ID form appears, check the Enable In App Purchase box.


Step 2. Creating the Development profile
- Click on Provisioning in the left column, then go to Development.
- Click on New Profile and fill in information as needed. You can put anything into the Profile Name field (as for me, I just typed in «InAppPurchasesExample Dev»).
- The newly created profile that appears in a list has a pending status. To make the profile available for download, either refresh the page or switch to another tab and then back.
- You can download the profile and then install it in xCode; to do the latter, either double-click on the profile or drag and drop it on the xCode icon.
If installation is successful, Organizer opens in xCode and you see something like this:


Step 3. Creating an application in iTunes Connect
To test your In-App Purchase application, you must create it in iTunes Connect. Do it as follows:
- Go to iTunes Connect and click on Manage Your Applications, then select Add New Application.
- When the question «Does your product contain encryption?» appears, answer in the negative.
- Filling in the form — giving your application name, description, version No., category, and so on — should be easy. The only difficulty may be with SKU Number, which must be unique; as for me, I entered «IAPEX» (abbreviation for In-App Purchases Example).
- On the Upload form, select «Upload application binary later.» (The other parameters and forms are irrelevant for my example.)
Step 4. Creating In-App Purchases in iTunes Connect
- In iTunes Connect, click on Manage Your In App Purchases, select Create New, and choose your application.
- Select Bundle ID and fill in the information on Purchase (type, name, price, etc.). Though you can use almost anything for a Product ID, I still recommend using Reverse DNS. It is advisable to make you Product ID from you application's Bundle ID and the feature name. In my case, it looks as follows:


For my application, I created two In-App products, whose Product IDs are com.wordpress.indiedevelop.InAppPurchasesExample.f1 and com.wordpress.indiedevelop.InAppPurchasesExample.f2, both non-consumables.
Step 5. Creating a test user
To test In-App Purchases, you need to create at least one test user:
- In iTunes Connect, select Manage Users, then select In App Purchase Test User.
- Click on Add New User.
- Enter the user information.
The test user's e-mail needn't be real. In my case, I created one test user:


Step 6. Programming
For my test application, I created a project framework and a User Interface:


For interacting with App Store, I recommend using the MKStoreKit framework (developed in 2009 by Mugunth Kumar), which makes handling StoreKit much easier. In addition to MKStoreKit, you need to add StoreKit.framework to your project.
In my case, I used a slightly modified MKStoreKit v. 1. To make my job easier, I added a delegate to the MKStoreManager class:
@protocol MKStoreKitDelegate @optional- (void)productAPurchased;- (void)productBPurchased;- (void)failed;@end
The delegate is to receive the message «productAPurchased» when Feature 1 is purchased; «productBPurchased», when Feature 1 is purchased; and «failed», when either the customer cancels the order or the purchase fails.
MKStoreKit's main class is the MKStoreManager singleton class. Here's its declaration:
@interface MKStoreManager : NSObject<SKProductsRequestDelegate> {...}// delegate@property (nonatomic, retain) id<MKStoreKitDelegate> delegate;// products available for purchase@property (nonatomic, retain) NSMutableArray *purchasableObjects;// factory method for Singleton+ (MKStoreManager*)sharedManager;// methods for feature buying- (void) buyFeatureA;- (void) buyFeatureB;// methods for checking whether the feature has been purchased+ (BOOL) featureAPurchased;+ (BOOL) featureBPurchased;...@end
Here's how the class is used in my test case:
First, I specified Product IDs for each feature in the MKStoreManager.m file.
static NSString *featureAId = @"com.wordpress.indiedevelop.InAppPurchasesExample.f1";static NSString *featureBId = @"com.wordpress.indiedevelop.InAppPurchasesExample.f2";
I also need to check whether application features have been purchased. As the main class inherits from UIViewController, it make sense to put the verification code into the viewDidLoad method:
- (void)viewDidLoad {[super viewDidLoad];[MKStoreManager sharedManager].delegate = self; // assigning the delegate for the MKStoreManager objectif ([MKStoreManager featureAPurchased]) // if feature 1 is purchased{feature1Button.hidden = YES; // hiding the Buy Feature 1 buttonseeFeature1Button.hidden = NO; // showing the Switch To Feature 1 button}if ([MKStoreManager featureBPurchased]) // if feature 2 is purchased{feature2Button.hidden = YES; // hiding the Buy Feature 2 buttonseeFeature2Button.hidden = NO; // showing the Switch To Feature 1 button}}
MKStoreKit uses NSUserDefaults for saving information on whether a product is purchased, so when the application is uninstalled, the information is lost. However, the user would not have to pay for the same feature twice as StoreKit would open access to the feature for free.
Now you need to implement the Purchase methods, which are bound to the TouchUpInside event by the following buttons:
-(IBAction)feature1ButtonPressed{[self showLockView]; // letting the user know about the download being done[[MKStoreManager sharedManager] buyFeatureA]; // sending the Buy Feature 1 message to the store}-(IBAction)feature2ButtonPressed{[self showLockView]; // letting the user know about the download being done[[MKStoreManager sharedManager] buyFeatureB]; // sending the Buy Feature 2 message to the store}
Here's how I implemented the MKStoreKitDelegate delegate methods:
// feature 1 is purchased- (void)productAPurchased{[self hideLockView]; // hiding the downloadfeature1Button.hidden = YES; // hiding the Buy buttonseeFeature1Button.hidden = NO; // showing the Switch button}// feature 2 is purchased- (void)productBPurchased{[self hideLockView]; // hiding the downloadfeature2Button.hidden = YES; // hiding the Buy buttonseeFeature2Button.hidden = NO; // showing the Switch button}// the purchase either failed or was cancelled- (void)failed{[self hideLockView]; // hiding the download}
I implemented the new features as separate UIView classes controlled by UIViewController, and the switchover to those features, using UINavigationController:
// switch to feature 1-(IBAction)seeFeature1{[self.navigationController pushViewController:feature1ViewController animated:YES];}// switch to feature 2-(IBAction)seeFeature2{[self.navigationController pushViewController:feature2ViewController animated:YES];}
When interacting with the store, you may also check its availability:
if ([SKPaymentQueue canMakePayments]){... // Show the store to the user}else{... // Tell the user that Purchases are unavailable}
As you can see, everything is rather simple. All that is remaining is to compile the code and to run some tests. :)
Step 7. Testing
To test In-App Purchases you need to compile, install and run the application. Please remember the following about the testing:
- Purchases must be tested on an actual device.
- Before you can start the test, quit iTunes on your iPhone: Settings -> Store -> Sign Out.
- When your test is running, you will see [Environment: sandbox] in the messages containing the offer to buy a feature, so that you know that's a test mode.
- You must use test accounts only (see Step 5) for your testing.
Test case: InAppPurchasesExample
As a result, I've got an application that can unlock two additional windows. You can use this application as an example for implementing your own In-App Purchase projects.


Hopefully, this article was useful for you. If you have any questions, please feel free to ask me — I'll be happy to answer.
Đăng ký:
Bài đăng (Atom)