1. Install Three20 viewer:
git clone git://github.com/facebook/three20.git
2. Configure thre20 for your project
python three20/src/scripts/ttmodule.py -p PhotoViewer/PhotoViewer.xcodeproj Three20
refer more at: http://three20.info/article/2010-10-06-Adding-Three20-To-Your-Project
3. Write sample:
http://www.raywenderlich.com/1430/how-to-use-the-three20-photo-viewer
Note: if you can not configure the sample code in this link. Please create new project, configure follow step 1, 2 then copy code. I did like that, work like a charm.
How to load image from camera roll:
Can not load directly, must use UIImagePickerController to pick then save it to document
Then use url: documents://paht to file to load into Photo object
Thứ Năm, 26 tháng 7, 2012
Thứ Ba, 24 tháng 7, 2012
Download of a file-like python object in web2py
Copy from:http://thadeusb.com/weblog/2010/1/17/download_of_a_filelike_python_object_in_web2py
Here are a couple of ways to expose any python file-like object as download-able in a web2py controller.
You might want to do this if you have a generated pdf report, or allowing an export of the sites content.
From your controller, you can stream a large file by using the stream function of the response object.
 You might also want to set the content type of what you are returning, as well as a new disposition (filename).
Here are a couple of ways to expose any python file-like object as download-able in a web2py controller.
You might want to do this if you have a generated pdf report, or allowing an export of the sites content.
From your controller, you can stream a large file by using the stream function of the response object.
return response.stream(filelikeobject, chunk_size=64*1024)
def export():
    from gluon.contenttype import contenttype
    response.headers['Content-Type'] = contenttype('.csv')
    response.headers['Content-disposition'] = 'attachment; filename=%s_database.csv' % (
        request.now
    )
    import csv, cStringIO
    s = cStringIO.StringIO()
    db.export_to_csv_file(s, delimiter=',', quotechar='"', quoting=csv.QUOTE_NONNUMERIC)
    return s.getvalue()
Thứ Ba, 19 tháng 6, 2012
How to swipe to delete on tableview cell
Just need 3 delegate methods:
- (UITableViewCellEditingStyle)tableView:(UITableView *)tableView
editingStyleForRowAtIndexPath:(NSIndexPath *)indexPath {
NSUInteger row = [indexPath row];
NSUInteger count = [savedTask count];
if (row < count) {
return UITableViewCellEditingStyleDelete;
} else {
return UITableViewCellEditingStyleNone;
}
}
/*
*Commit delete action
*/
- (void)tableView:(UITableView *)tableView
commitEditingStyle:(UITableViewCellEditingStyle)editingStyle
forRowAtIndexPath:(NSIndexPath *)indexPath {
NSUInteger row = [indexPath row];
NSUInteger count = [savedTask count];
if (row < count) {
NSMutableArray* temparr = [[NSMutableArray alloc] initWithArray:savedTask];
[temparr removeObjectAtIndex:row];
savedTask = temparr;
}
}
- (void)tableView:(UITableView *)tableView
didEndEditingRowAtIndexPath:(NSIndexPath *)indexPath {
[tableView reloadData];
}
Thứ Bảy, 2 tháng 6, 2012


Thứ Bảy, 21 tháng 4, 2012
UIPickerView
From: http://www.roseindia.net/tutorial/iphone/examples/UIPickerView/UIPickerViewExample.html
Step 1: Create a new project
Fire up Xcode IDE and the select File--> New Project and then select "Window-based Application" from the new project template wizard.
Step 2:
Name the project as "UIPickerView" and then click the "Save" button. The Xcode IDE will create a new project for you.
Step 3: Add ViewController class
Then add new UIViewControllerSubclass as shown below.
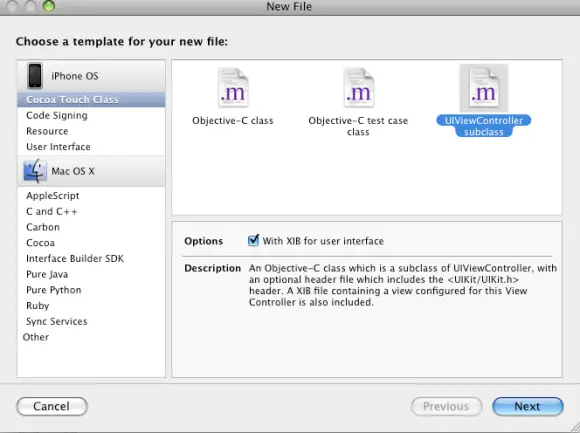
and named it as "ViewController.m". The Xcode IDE will automatically create ViewController.h and ViewController.xib files.
Step 4: Add UI Components to the View
Double click on the "ViewController.xib" from the Groups & Files tree and shown below.

Xcode will open the Interface builder. Then add One two label and UIPickerView components on the view as shown below.
Finally save the files and close the Interface builder.
Step 5: Add the code in ViewController.h and ViewController.m files
Open ViewController.h class and then implement the UIPickerViewDelegate, UIPickerViewDataSource classes.
The code for the class will look like:
@interface ViewController : UIViewController
In ViewController.h create following Outlets and variables.
IBOutlet UILabel *mlabel;
NSMutableArray *arrayNo;
IBOutlet UIPickerView *pickerView;
and then create the property
@property (nonatomic, retain) UILabel *mlabel;
Your ViewController.m should look like:
In ViewController.m synthesize the label:
@synthesize mlabel;
Add the following code in the viewDidLoad method. Your viewDidLoad should look like:
- (void)viewDidLoad
{
[super viewDidLoad];
arrayNo = [[NSMutableArray alloc] init];
[arrayNo addObject:@" 100 "];
[arrayNo addObject:@" 200 "];
[arrayNo addObject:@" 400 "];
[arrayNo addObject:@" 600 "];
[arrayNo addObject:@" 1000 "];
[pickerView selectRow:1 inComponent:0 animated:NO];
mlabel.text= [arrayNo objectAtIndex:[pickerView selectedRowInComponent:0]];
}
also add the following code into the ViewController.m file.
- (NSInteger)numberOfComponentsInPickerView:(UIPickerView *)pickerView;
{
return 1;
}
- (void)pickerView:(UIPickerView *)pickerView didSelectRow:(NSInteger)row inComponent:(NSInteger)component
{
mlabel.text= [arrayNo objectAtIndex:row];
}
- (NSInteger)pickerView:(UIPickerView *)pickerView numberOfRowsInComponent:(NSInteger)component;
{
return [arrayNo count];
}
- (NSString *)pickerView:(UIPickerView *)pickerView titleForRow:(NSInteger)row forComponent:(NSInteger)component;
{
return [arrayNo objectAtIndex:row];
}
The final ViewController.m file should look like:
Step 6: Create the connections
Double click on the "ViewController.xib" from the Groups & Files tree. And then choose the UIViewPickerView component on the view and create the following Outlets:
dataSoucrce --> File's Owner
delegate --> File's Owner
Then connect the second label to mlabel variable.

Step 7: Load view from UIPickerViewAppDelegate.m class
Open UIPickerViewAppDelegate.h class and then add the code
ViewController *mviewController;
and
@property (nonatomic, retain) ViewController *mviewController;
your file should look like:
Open UIPickerViewAppDelegate.m and then add the following code in - (void)applicationDidFinishLaunching:(UIApplication *)application function:
mviewController = [[ViewController alloc] initWithNibName:@"ViewController" bundle:[NSBundle mainBundle]];
[window addSubview:mviewController.view];
The UIPickerViewAppDelegate.m should look like:
Step 8: Build and Run
Now click on the Build and Go. You be get the following output in the iPhone simulator.
Step 1: Create a new project
Fire up Xcode IDE and the select File--> New Project and then select "Window-based Application" from the new project template wizard.
Step 2:
Name the project as "UIPickerView" and then click the "Save" button. The Xcode IDE will create a new project for you.
Step 3: Add ViewController class
Then add new UIViewControllerSubclass as shown below.
and named it as "ViewController.m". The Xcode IDE will automatically create ViewController.h and ViewController.xib files.
Step 4: Add UI Components to the View
Double click on the "ViewController.xib" from the Groups & Files tree and shown below.
Xcode will open the Interface builder. Then add One two label and UIPickerView components on the view as shown below.
Finally save the files and close the Interface builder.
Step 5: Add the code in ViewController.h and ViewController.m files
Open ViewController.h class and then implement the UIPickerViewDelegate, UIPickerViewDataSource classes.
The code for the class will look like:
@interface ViewController : UIViewController
In ViewController.h create following Outlets and variables.
IBOutlet UILabel *mlabel;
NSMutableArray *arrayNo;
IBOutlet UIPickerView *pickerView;
and then create the property
@property (nonatomic, retain) UILabel *mlabel;
Your ViewController.m should look like:
//
// ViewController.h
// UIPickerView
//
// Created by Deepak Kumar on 31/07/09.
//
#import
@interface ViewController : UIViewController
{
IBOutlet UILabel *mlabel;
NSMutableArray *arrayNo;
IBOutlet UIPickerView *pickerView;
}
@property (nonatomic, retain) UILabel *mlabel;
@end
In ViewController.m synthesize the label:
@synthesize mlabel;
Add the following code in the viewDidLoad method. Your viewDidLoad should look like:
- (void)viewDidLoad
{
[super viewDidLoad];
arrayNo = [[NSMutableArray alloc] init];
[arrayNo addObject:@" 100 "];
[arrayNo addObject:@" 200 "];
[arrayNo addObject:@" 400 "];
[arrayNo addObject:@" 600 "];
[arrayNo addObject:@" 1000 "];
[pickerView selectRow:1 inComponent:0 animated:NO];
mlabel.text= [arrayNo objectAtIndex:[pickerView selectedRowInComponent:0]];
}
also add the following code into the ViewController.m file.
- (NSInteger)numberOfComponentsInPickerView:(UIPickerView *)pickerView;
{
return 1;
}
- (void)pickerView:(UIPickerView *)pickerView didSelectRow:(NSInteger)row inComponent:(NSInteger)component
{
mlabel.text= [arrayNo objectAtIndex:row];
}
- (NSInteger)pickerView:(UIPickerView *)pickerView numberOfRowsInComponent:(NSInteger)component;
{
return [arrayNo count];
}
- (NSString *)pickerView:(UIPickerView *)pickerView titleForRow:(NSInteger)row forComponent:(NSInteger)component;
{
return [arrayNo objectAtIndex:row];
}
The final ViewController.m file should look like:
//
// ViewController.m
// UIPickerView
//
// Created by Deepak Kumar on 31/07/09.
//
#import "ViewController.h"
@implementation ViewController
@synthesize mlabel;
- (void)viewDidLoad
{
[super viewDidLoad];
arrayNo = [[NSMutableArray alloc] init];
[arrayNo addObject:@" 100 "];
[arrayNo addObject:@" 200 "];
[arrayNo addObject:@" 400 "];
[arrayNo addObject:@" 600 "];
[arrayNo addObject:@" 1000 "];
[pickerView selectRow:1 inComponent:0 animated:NO];
mlabel.text= [arrayNo objectAtIndex:[pickerView selectedRowInComponent:0]];
}
- (NSInteger)numberOfComponentsInPickerView:(UIPickerView *)pickerView;
{
return 1;
}
- (void)pickerView:(UIPickerView *)pickerView didSelectRow:(NSInteger)row inComponent:(NSInteger)component
{
mlabel.text= [arrayNo objectAtIndex:row];
}
- (NSInteger)pickerView:(UIPickerView *)pickerView numberOfRowsInComponent:(NSInteger)component;
{
return [arrayNo count];
}
- (NSString *)pickerView:(UIPickerView *)pickerView titleForRow:(NSInteger)row forComponent:(NSInteger)component;
{
return [arrayNo objectAtIndex:row];
}
/*
// The designated initializer. Override
if you create the controller programmatically and want to perform
customization that is not appropriate for viewDidLoad.
- (id)initWithNibName:(NSString *)nibNameOrNil bundle:(NSBundle *)nibBundleOrNil {
if (self = [super initWithNibName:nibNameOrNil bundle:nibBundleOrNil]) {
// Custom initialization
}
return self;
}
*/
/*
// Implement viewDidLoad to do additional setup after loading the view, typically from a nib.
- (void)viewDidLoad {
[super viewDidLoad];
}
*/
/*
// Override to allow orientations other than the default portrait orientation.
- (BOOL)shouldAutorotateToInterfaceOrientation:(UIInterfaceOrientation)interfaceOrientation {
// Return YES for supported orientations
return (interfaceOrientation == UIInterfaceOrientationPortrait);
}
*/
- (void)didReceiveMemoryWarning {
// Releases the view if it doesn't have a superview.
[super didReceiveMemoryWarning];
// Release any cached data, images, etc that aren't in use.
}
- (void)viewDidUnload
{
// Release any retained subviews of the main view.
// e.g. self.myOutlet = nil;
}
- (void)dealloc {
[super dealloc];
}
@end
Step 6: Create the connections
Double click on the "ViewController.xib" from the Groups & Files tree. And then choose the UIViewPickerView component on the view and create the following Outlets:
dataSoucrce --> File's Owner
delegate --> File's Owner
Then connect the second label to mlabel variable.
Step 7: Load view from UIPickerViewAppDelegate.m class
Open UIPickerViewAppDelegate.h class and then add the code
ViewController *mviewController;
and
@property (nonatomic, retain) ViewController *mviewController;
your file should look like:
#import
@class ViewController;
@interface UIPickerViewAppDelegate : NSObject
{
ViewController *mviewController;
UIWindow *window;
}
@property (nonatomic, retain) IBOutlet UIWindow *window;
@property (nonatomic, retain) ViewController *mviewController;
@end
Open UIPickerViewAppDelegate.m and then add the following code in - (void)applicationDidFinishLaunching:(UIApplication *)application function:
mviewController = [[ViewController alloc] initWithNibName:@"ViewController" bundle:[NSBundle mainBundle]];
[window addSubview:mviewController.view];
The UIPickerViewAppDelegate.m should look like:
//
// UIPickerViewAppDelegate.m
// UIPickerView
//
// Created by Deepak Kumar on 31/07/09.
//
#import "UIPickerViewAppDelegate.h"
#import "ViewController.h"
@implementation UIPickerViewAppDelegate
@synthesize window;
@synthesize mviewController;
- (void)applicationDidFinishLaunching:(UIApplication *)application
{
mviewController = [[ViewController alloc] initWithNibName:@"ViewController" bundle:[NSBundle mainBundle]];
[window addSubview:mviewController.view];
[window makeKeyAndVisible];
}
- (void)dealloc
{
[window release];
[ViewController release];
[super dealloc];
}
@end
Step 8: Build and Run
Now click on the Build and Go. You be get the following output in the iPhone simulator.
Thứ Ba, 15 tháng 11, 2011
Verify transaction Receipt (Server, python)
#!/usr/bin/env pythonimport sysimport jsonimport base64import urllib2liveURL = 'https://buy.itunes.apple.com/verifyReceipt'sandboxURL = 'https://sandbox.itunes.apple.com/verifyReceipt'URL = sandboxURLdef main():if len(sys.argv) < 2:print 'USAGE: verifyReceipt RECEIPT'sys.exit()with open(sys.argv[1]) as f:verifyReceipt(f.read())def verifyReceipt(receipt):receiptData = base64.b64encode(receipt)jsonData = json.dumps({'receipt-data': receiptData})s = urllib2.urlopen(URL, jsonData)responseData = s.read()s.close()responseJSON = json.loads(responseData)print json.dumps(responseJSON, sort_keys=True, indent=4)
stattus = responseJSON.get_data("status","unknown")if __name__ == '__main__':main()
Thứ Sáu, 4 tháng 11, 2011
Deploy App to iPhone Device
Deploying iPhone Apps to Real Devices

Posted by weimenglee 2 years 23 weeks ago
In our previous article on getting started with iPhone development, you learnt how to use the iPhone SDK provided by Apple to develop your first iPhone application. For testing purposes, you used the iPhone Simulator, provided as part of the iPhone SDK. While the iPhone Simulator is a very handy tool that allows you to test your iPhone applications without needing a real device, nothing beats testing on a real device. This is especially true when you are ready to roll out your applications to the world - you must ensure that it works correctly on real devices. In addition, if your application requires accesses to hardware features on an iPhone/iPod Touch, such as the accelerometer and GPS, you need to test it on a real device - the iPhone Simulator is simply not adequate.
A repeated criticism from iPhone app developers comes from the difficulty they find in deploying their application to a real iPhone or iPod Touch. Apple, for better or worse, has designed a process involving many hoops that must be jumped through, and this has prompted developers to grumble, and others to explore alternative, non-official open tool chains, which do not require app signing. In this article, I will walk you through the steps you need to take in order to test your iPhone apps on a real device, be it iPhone, or iPod Touch, the offical Apple way.
Sign up for the iPhone Developer Program
The first step towards testing your applications on a real device is to sign up for the iPhone Developer Program at http://developer.apple.com/iphone/program/. There are two programs available - Standard and Enterprise. For most developers wanting to release applications on the App Store, they can simply sign up for the Standard program, which costs US$99. Check out http://developer.apple.com/iphone/program/apply.html to know more about the differences between the Standard and Enterprise programs.
Start your Xcode
In order to test your iPhone applications on your device, you need to obtain an iPhone Development Certificate from the iPhone Developer Program Portal. This needs to be done once for every device you wish to test your apps on. The following sections walk you through the various steps, from obtaining your certificate, to deploying your applications onto the device.
First, obtain the 40-character identifier that uniquely identitfies your iPhone/iPod Touch. To do so, connect your device to your Mac and start Xcode. Select the Window > Organizer menu item to launch the Organizer application. Figure 1 shows the Organizer application showing the identifier of my iPhone. Copy this identifier and save it somewhere. You will need it later on.
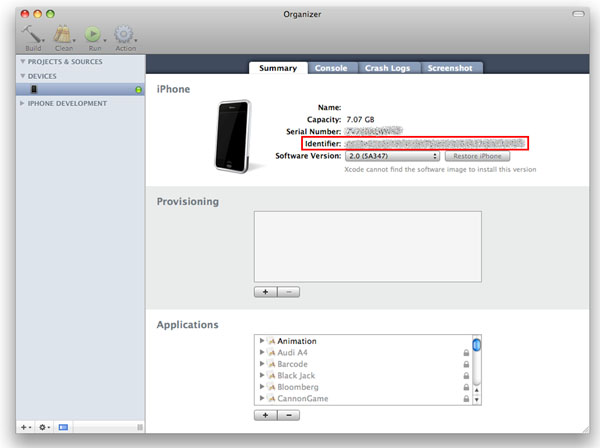
Figure 1 Obtaining the identifier for your iPhone/iPod Touch
Generating a Certificate Signing Request
Before you can request a development certificate from Apple, you need to generate a Certificate Signing Request. This step must be performed once for every device you wish to test on. To generate the request, you can use the Keychain Access application located in the Applications/Utilities/ folder (see Figure 2).

Figure 2 Launching the Keychain Access application
In the Keychain Access application, select the Keychain Access > Certificate Assistant menu and select Request a Certificate From a Certificate Authority (see Figure 3).
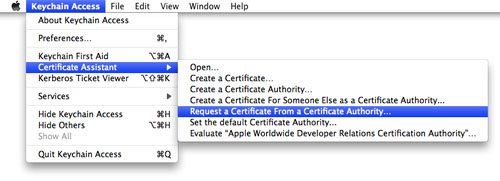
Figure 3 Requesting a certificate
In the Certificate Assistant window (see Figure 4), enter your email address, check the Saved to disk radio button and check the Let me specify key pair information checkbox. Click Continue.

Figure 4 Providing certificate information
Choose a key size of 2048 bits and use the RSA algorithm (see Figure 5). Click Continue.

Figure 5 Specifying key pair information
You will be asked to save the request to a file. Use the default name suggested and click Save (see Figure 6).

Figure 6 Saving the certificate request to a file
Logging in to the iPhone Developer Program Portal
Once you have generated the certificate signing request, you need to login to Apple's iPhone Dev Center (see Figure 7). Click on the iPhone Developer Program Portal link on the right of the page. Remember, you need to pay US$99 in order to access this page.

Figure 7 Logging in to the iPhone Dev Center
In the iPhone Developer Program Portal page, click the Launch Assistant button (see Figure 8) to walk you through the process of provisioning your iPhone and generating the development certificate.

Figure 8 Launching the provisioning assistant
You should see the welcome page as shown in Figure 9. Click Continue.

Figure 9 The welcome page of the provisioning assistant
First, you will be asked to create an App ID (see Figure 10). An App ID is a series of characters used to uniquely identify an application (or applications) on your iPhone. You only need to create an App ID once per application, i.e. you do not need a new App ID for new versions of your app. Enter a friendly name to describe this App ID (to be generated by Apple). Click Continue.

Figure 10 Creating an App ID
The next screen allows you to provide a description of your iPhone/iPod Touch. You need to provide the device ID that you have obtained earlier (see Figure 11). Click Continue.

Figure 11 Assigning a device for the provisioning
You are now ready to submit the certificate signing request to Apple (see Figure 12). The instructions on the screen show you the steps that you have performed earlier. Click Continue.

Figure 12 Generating a certificate signing request
In this screen, click the Choose File button (see Figure 13) to select the certificate signing request file that you have created earlier. Once the file has been selected, click Continue.
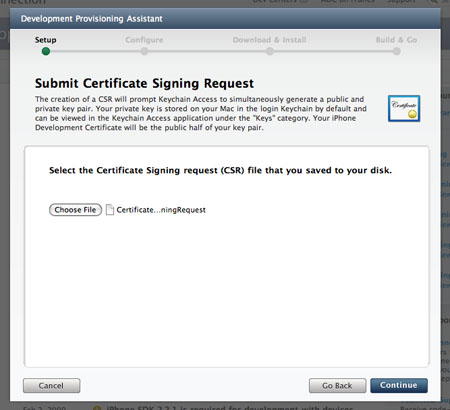
Figure 13 Submitting a certificate signing request
Provide a description for your provisioning profile (see Figure 14). A Provisioning profile will be generated so that you can download it at a later stage and install it on your device. Click Generate.

Figure 14 Naming your provisioning profile
A Provisioning profile will now be generated (see Figure 15). Once it is generated, click Continue.

Figure 15 Generating a provisioning profile
You are now ready to download the generated Provisioning profile onto your Mac (see Figure 16). Click Continue.

Figure 16 Downloading and installing your provisioning profile
Drag and drop the downloaded Provisioning profile (in the Downloads folder) onto Xcode (located in the Dock). This will install the Provisioning profile onto your connected iPhone/iPod Touch. Click Continue (see Figure 17).

Figure 17 Instructions to verify the installation
You can verify that the Provisioning profile is installed correctly on your device by going to the Organizer application and viewing the Provisioning section (see Figure 18) to see if the profile has been added.

Figure 18 Verifying the provisioning profile on the Organizer
Back in the iPhone Developer Program Portal, you are now ready to download and install the development certificate onto your iPhone/iPod Touch. Click the Download Now button (see Figure 19) to download the development certificate to your Mac. Click Continue.

Figure 19 Downloading and installing the development certificate
In the Downloads folder of your Mac, double-click on the developer_identify.cer file that you have just downloaded to install it into a keychain on your Mac. When prompted (see Figure 20), click OK.

Figure 20 Adding a certificate to the keychain
Back in the iPhone Developer Program Portal, you can now verify that the certificate has been installed properly in the Keychain Access application (see Figure 21). Click Continue.

Figure 21 Instructions for verifying the installation of the certificate
In the Keychain Access application, select the login keychain and look for the certificate named "iPhone Developer:" (see Figure 22). If you can see it there, your certificate is installed correctly.

Figure 22 Verifying the installation of the certificate
You are now almost ready to deploy your iPhone application onto your iPhone/iPod Touch. Click Continue (see Figure 23).

Figure 23 Instructions for installing your applications with Xcode
Click Done to dismiss the dialog (see Figure 24).

Figure 24 Finishing the installation
In Xcode, under the Active SDK item (if this item is not already on the toolbar, go to View > Customize Toolbar and add it to the toolbar), select the OS version number of the device that is currently connected to your Mac. In my case, my iPhone is running the older iPhone OS 2.0, hence I selected "iPhone Device (2.0)" (see Figure 25).
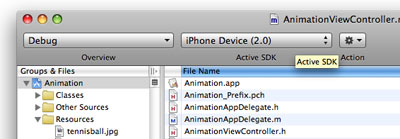
Figure 25 Selecting the active SDK
With your application project open in Xcode, press Command-R to run the application. You will now be prompted for permission to access the certificate saved in your keychain. Click Allow (or Always Allow) to go ahead with the signing (see Figure 26).

Figure 26 Signing your application with the certificate
Your application will now be deployed to the device. You can see its progress in the Summary tab of the Organizer application (see Figure 27).

Figure 27 Checking the Organizer for installation progress
Once the application is deployed onto your device, it will be running automatically. You can capture screenshots of your device by going to the Screenshot tab of the Organizer application, and pressing the capture button (see Figure 28).

Figure 28 Capturing screenshots using Organizer
Summary
In this article, you have seen the various steps required to deploy your application to your iPhone or iPod Touch. While the number of steps looked intimidating, it is actually quite straightforward. The iPhone Developer program allows you to provision up to 100 devices for testing purposes. Once a device is provisioned, you can then use the development certificate to deploy your applications onto it.
Đăng ký:
Bài đăng (Atom)