#!/usr/bin/env pythonimport sysimport jsonimport base64import urllib2liveURL = 'https://buy.itunes.apple.com/verifyReceipt'sandboxURL = 'https://sandbox.itunes.apple.com/verifyReceipt'URL = sandboxURLdef main():if len(sys.argv) < 2:print 'USAGE: verifyReceipt RECEIPT'sys.exit()with open(sys.argv[1]) as f:verifyReceipt(f.read())def verifyReceipt(receipt):receiptData = base64.b64encode(receipt)jsonData = json.dumps({'receipt-data': receiptData})s = urllib2.urlopen(URL, jsonData)responseData = s.read()s.close()responseJSON = json.loads(responseData)print json.dumps(responseJSON, sort_keys=True, indent=4)
stattus = responseJSON.get_data("status","unknown")if __name__ == '__main__':main()
Thứ Ba, 15 tháng 11, 2011
Verify transaction Receipt (Server, python)
Thứ Sáu, 4 tháng 11, 2011
Deploy App to iPhone Device
Deploying iPhone Apps to Real Devices

Posted by weimenglee 2 years 23 weeks ago
In our previous article on getting started with iPhone development, you learnt how to use the iPhone SDK provided by Apple to develop your first iPhone application. For testing purposes, you used the iPhone Simulator, provided as part of the iPhone SDK. While the iPhone Simulator is a very handy tool that allows you to test your iPhone applications without needing a real device, nothing beats testing on a real device. This is especially true when you are ready to roll out your applications to the world - you must ensure that it works correctly on real devices. In addition, if your application requires accesses to hardware features on an iPhone/iPod Touch, such as the accelerometer and GPS, you need to test it on a real device - the iPhone Simulator is simply not adequate.
A repeated criticism from iPhone app developers comes from the difficulty they find in deploying their application to a real iPhone or iPod Touch. Apple, for better or worse, has designed a process involving many hoops that must be jumped through, and this has prompted developers to grumble, and others to explore alternative, non-official open tool chains, which do not require app signing. In this article, I will walk you through the steps you need to take in order to test your iPhone apps on a real device, be it iPhone, or iPod Touch, the offical Apple way.
Sign up for the iPhone Developer Program
The first step towards testing your applications on a real device is to sign up for the iPhone Developer Program at http://developer.apple.com/iphone/program/. There are two programs available - Standard and Enterprise. For most developers wanting to release applications on the App Store, they can simply sign up for the Standard program, which costs US$99. Check out http://developer.apple.com/iphone/program/apply.html to know more about the differences between the Standard and Enterprise programs.
Start your Xcode
In order to test your iPhone applications on your device, you need to obtain an iPhone Development Certificate from the iPhone Developer Program Portal. This needs to be done once for every device you wish to test your apps on. The following sections walk you through the various steps, from obtaining your certificate, to deploying your applications onto the device.
First, obtain the 40-character identifier that uniquely identitfies your iPhone/iPod Touch. To do so, connect your device to your Mac and start Xcode. Select the Window > Organizer menu item to launch the Organizer application. Figure 1 shows the Organizer application showing the identifier of my iPhone. Copy this identifier and save it somewhere. You will need it later on.
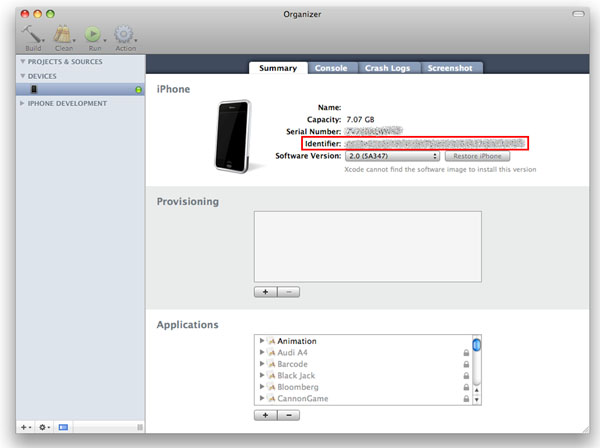
Figure 1 Obtaining the identifier for your iPhone/iPod Touch
Generating a Certificate Signing Request
Before you can request a development certificate from Apple, you need to generate a Certificate Signing Request. This step must be performed once for every device you wish to test on. To generate the request, you can use the Keychain Access application located in the Applications/Utilities/ folder (see Figure 2).

Figure 2 Launching the Keychain Access application
In the Keychain Access application, select the Keychain Access > Certificate Assistant menu and select Request a Certificate From a Certificate Authority (see Figure 3).
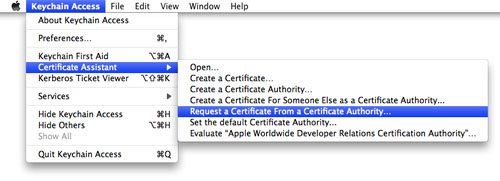
Figure 3 Requesting a certificate
In the Certificate Assistant window (see Figure 4), enter your email address, check the Saved to disk radio button and check the Let me specify key pair information checkbox. Click Continue.

Figure 4 Providing certificate information
Choose a key size of 2048 bits and use the RSA algorithm (see Figure 5). Click Continue.

Figure 5 Specifying key pair information
You will be asked to save the request to a file. Use the default name suggested and click Save (see Figure 6).

Figure 6 Saving the certificate request to a file
Logging in to the iPhone Developer Program Portal
Once you have generated the certificate signing request, you need to login to Apple's iPhone Dev Center (see Figure 7). Click on the iPhone Developer Program Portal link on the right of the page. Remember, you need to pay US$99 in order to access this page.

Figure 7 Logging in to the iPhone Dev Center
In the iPhone Developer Program Portal page, click the Launch Assistant button (see Figure 8) to walk you through the process of provisioning your iPhone and generating the development certificate.

Figure 8 Launching the provisioning assistant
You should see the welcome page as shown in Figure 9. Click Continue.

Figure 9 The welcome page of the provisioning assistant
First, you will be asked to create an App ID (see Figure 10). An App ID is a series of characters used to uniquely identify an application (or applications) on your iPhone. You only need to create an App ID once per application, i.e. you do not need a new App ID for new versions of your app. Enter a friendly name to describe this App ID (to be generated by Apple). Click Continue.

Figure 10 Creating an App ID
The next screen allows you to provide a description of your iPhone/iPod Touch. You need to provide the device ID that you have obtained earlier (see Figure 11). Click Continue.

Figure 11 Assigning a device for the provisioning
You are now ready to submit the certificate signing request to Apple (see Figure 12). The instructions on the screen show you the steps that you have performed earlier. Click Continue.

Figure 12 Generating a certificate signing request
In this screen, click the Choose File button (see Figure 13) to select the certificate signing request file that you have created earlier. Once the file has been selected, click Continue.
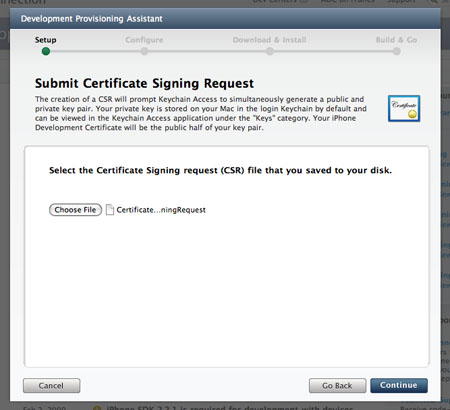
Figure 13 Submitting a certificate signing request
Provide a description for your provisioning profile (see Figure 14). A Provisioning profile will be generated so that you can download it at a later stage and install it on your device. Click Generate.

Figure 14 Naming your provisioning profile
A Provisioning profile will now be generated (see Figure 15). Once it is generated, click Continue.

Figure 15 Generating a provisioning profile
You are now ready to download the generated Provisioning profile onto your Mac (see Figure 16). Click Continue.

Figure 16 Downloading and installing your provisioning profile
Drag and drop the downloaded Provisioning profile (in the Downloads folder) onto Xcode (located in the Dock). This will install the Provisioning profile onto your connected iPhone/iPod Touch. Click Continue (see Figure 17).

Figure 17 Instructions to verify the installation
You can verify that the Provisioning profile is installed correctly on your device by going to the Organizer application and viewing the Provisioning section (see Figure 18) to see if the profile has been added.

Figure 18 Verifying the provisioning profile on the Organizer
Back in the iPhone Developer Program Portal, you are now ready to download and install the development certificate onto your iPhone/iPod Touch. Click the Download Now button (see Figure 19) to download the development certificate to your Mac. Click Continue.

Figure 19 Downloading and installing the development certificate
In the Downloads folder of your Mac, double-click on the developer_identify.cer file that you have just downloaded to install it into a keychain on your Mac. When prompted (see Figure 20), click OK.

Figure 20 Adding a certificate to the keychain
Back in the iPhone Developer Program Portal, you can now verify that the certificate has been installed properly in the Keychain Access application (see Figure 21). Click Continue.

Figure 21 Instructions for verifying the installation of the certificate
In the Keychain Access application, select the login keychain and look for the certificate named "iPhone Developer:" (see Figure 22). If you can see it there, your certificate is installed correctly.

Figure 22 Verifying the installation of the certificate
You are now almost ready to deploy your iPhone application onto your iPhone/iPod Touch. Click Continue (see Figure 23).

Figure 23 Instructions for installing your applications with Xcode
Click Done to dismiss the dialog (see Figure 24).

Figure 24 Finishing the installation
In Xcode, under the Active SDK item (if this item is not already on the toolbar, go to View > Customize Toolbar and add it to the toolbar), select the OS version number of the device that is currently connected to your Mac. In my case, my iPhone is running the older iPhone OS 2.0, hence I selected "iPhone Device (2.0)" (see Figure 25).
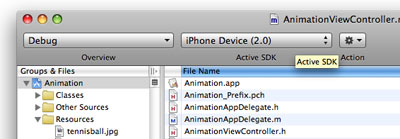
Figure 25 Selecting the active SDK
With your application project open in Xcode, press Command-R to run the application. You will now be prompted for permission to access the certificate saved in your keychain. Click Allow (or Always Allow) to go ahead with the signing (see Figure 26).

Figure 26 Signing your application with the certificate
Your application will now be deployed to the device. You can see its progress in the Summary tab of the Organizer application (see Figure 27).

Figure 27 Checking the Organizer for installation progress
Once the application is deployed onto your device, it will be running automatically. You can capture screenshots of your device by going to the Screenshot tab of the Organizer application, and pressing the capture button (see Figure 28).

Figure 28 Capturing screenshots using Organizer
Summary
In this article, you have seen the various steps required to deploy your application to your iPhone or iPod Touch. While the number of steps looked intimidating, it is actually quite straightforward. The iPhone Developer program allows you to provision up to 100 devices for testing purposes. Once a device is provisioned, you can then use the development certificate to deploy your applications onto it.
Thứ Ba, 12 tháng 10, 2010
Button va Handle Event
UIButton *myButton = [UIButton buttonWithType:UIButtonTypeRoundedRect];
myButton.frame = CGRectMake(20, 20, 200, 44); // position in the parent view and set the size of the button
[myButton setTitle:@"Click Me!" forState:UIControlStateNormal];
// add targets and actions
[myButton addTarget:self action:@selector(buttonClicked:) forControlEvents:UIControlEventTouchUpInside];
// add to a view
[superView addSubview:myButton];
Thứ Năm, 7 tháng 10, 2010
How to Integrate In-App Purchases
From: http://www.splashnology.com/blog/iphone/360.html
General Information
There are three types of In-App Purchases:
- Consumables
- Subscriptions
Non-Consumables
A consumable purchase may be effected more than once. For example, if you've ever played the game Eliminate you know that you need to
restore your «energy» from time to time, when its level goes too low. The catch is that a player can either wait for three hours until the energy is replenished naturally or buy it for real money.
A non-consumable purchase can be effected only
once. This kind of purchase is useful for unlocking new themes, additional levels, and so on.
A subscription can be used, as you might have guessed, for subscribing to some service. For example, you can make an iPhone application for a Web service with a Premium account that is activated, say, for a month or for a year.
You can implement In-App Purchases using either of the following two models:
- Built-in model
- Server model
The built-in model lets the user unlock some featur
es. Usually it means that those features must already be present in the application, so that StoreKit only handles the payment for the feature. Generally, StoreKit lets you check whether the purchase was successfully effected.
The server model is more flexible and involves three entities: an iPhone application, the Apple server and our (that is the developer's) server. All new features are stored on our server, so we don't have to update the application whenever we add some new features or new software products. The model works as follows:
- The iPhone application requests a list of products from its server.
- The iPhone application displays the new products to the user.
- The user buys something — or doesn't. :)
- The iPhone application requests the purchase from the Apple server via StoreKit.
- StoreKit delivers the reply.
- The iPhone application forwards the reply to our
- The reply is re-checked — it must be always verified whether the reply was actually received from Apple's server.
- If everything is fine, the iPhone application downloads the new product from our server.
server.
This article is about the built-in model.
Implementation
To demonstrate how the built-in model works I'll be using a test case, AppPurchasesExample — a simple iPhone application that has three windows. The main window, which the user can see by default, contains information about two other windows, which can be unlocked only if the user agrees to pay for that.
Step 1. Creating App ID
Go to the iPhone Developer Program Portal and click on App ID
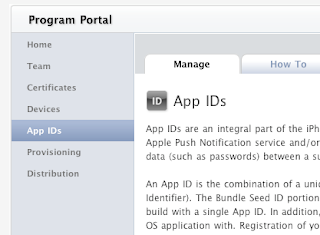
Click on New App ID (in the screen's top right corner), then enter the information on your application. I've filled in the form as follows:


Apple recommends using the Reverse DNS naming convention to make a Bundle Identifier, which ensures that your identifier is unique — that might save you a lot of trouble when publishing your application. It is extremely important that you do not use the asterisk (*) in the Bundle Identifier! If you fail to follow the advice and enter com.wordpress.indiedevelop.* or something like that, In-App Purchases won't work at all!
Then you need to enable In-App Purchases for your App ID. In the App IDs list, click on your Bundle Identifier's Configure button. When a Configure App ID form appears, check the Enable In App Purchase box.


Step 2. Creating the Development profile
- Click on Provisioning in the left column, then go to Development.
- Click on New Profile and fill in information as needed. You can put anything into the Profile Name field (as for me, I just typed in «InAppPurchasesExample Dev»).
- The newly created profile that appears in a list has a pending status. To make the profile available for download, either refresh the page or switch to another tab and then back.
- You can download the profile and then install it in xCode; to do the latter, either double-click on the profile or drag and drop it on the xCode icon.
If installation is successful, Organizer opens in xCode and you see something like this:


Step 3. Creating an application in iTunes Connect
To test your In-App Purchase application, you must create it in iTunes Connect. Do it as follows:
- Go to iTunes Connect and click on Manage Your Applications, then select Add New Application.
- When the question «Does your product contain encryption?» appears, answer in the negative.
- Filling in the form — giving your application name, description, version No., category, and so on — should be easy. The only difficulty may be with SKU Number, which must be unique; as for me, I entered «IAPEX» (abbreviation for In-App Purchases Example).
- On the Upload form, select «Upload application binary later.» (The other parameters and forms are irrelevant for my example.)
Step 4. Creating In-App Purchases in iTunes Connect
- In iTunes Connect, click on Manage Your In App Purchases, select Create New, and choose your application.
- Select Bundle ID and fill in the information on Purchase (type, name, price, etc.). Though you can use almost anything for a Product ID, I still recommend using Reverse DNS. It is advisable to make you Product ID from you application's Bundle ID and the feature name. In my case, it looks as follows:


For my application, I created two In-App products, whose Product IDs are com.wordpress.indiedevelop.InAppPurchasesExample.f1 and com.wordpress.indiedevelop.InAppPurchasesExample.f2, both non-consumables.
Step 5. Creating a test user
To test In-App Purchases, you need to create at least one test user:
- In iTunes Connect, select Manage Users, then select In App Purchase Test User.
- Click on Add New User.
- Enter the user information.
The test user's e-mail needn't be real. In my case, I created one test user:


Step 6. Programming
For my test application, I created a project framework and a User Interface:


For interacting with App Store, I recommend using the MKStoreKit framework (developed in 2009 by Mugunth Kumar), which makes handling StoreKit much easier. In addition to MKStoreKit, you need to add StoreKit.framework to your project.
In my case, I used a slightly modified MKStoreKit v. 1. To make my job easier, I added a delegate to the MKStoreManager class:
@protocol MKStoreKitDelegate @optional- (void)productAPurchased;- (void)productBPurchased;- (void)failed;@end
The delegate is to receive the message «productAPurchased» when Feature 1 is purchased; «productBPurchased», when Feature 1 is purchased; and «failed», when either the customer cancels the order or the purchase fails.
MKStoreKit's main class is the MKStoreManager singleton class. Here's its declaration:
@interface MKStoreManager : NSObject<SKProductsRequestDelegate> {...}// delegate@property (nonatomic, retain) id<MKStoreKitDelegate> delegate;// products available for purchase@property (nonatomic, retain) NSMutableArray *purchasableObjects;// factory method for Singleton+ (MKStoreManager*)sharedManager;// methods for feature buying- (void) buyFeatureA;- (void) buyFeatureB;// methods for checking whether the feature has been purchased+ (BOOL) featureAPurchased;+ (BOOL) featureBPurchased;...@end
Here's how the class is used in my test case:
First, I specified Product IDs for each feature in the MKStoreManager.m file.
static NSString *featureAId = @"com.wordpress.indiedevelop.InAppPurchasesExample.f1";static NSString *featureBId = @"com.wordpress.indiedevelop.InAppPurchasesExample.f2";
I also need to check whether application features have been purchased. As the main class inherits from UIViewController, it make sense to put the verification code into the viewDidLoad method:
- (void)viewDidLoad {[super viewDidLoad];[MKStoreManager sharedManager].delegate = self; // assigning the delegate for the MKStoreManager objectif ([MKStoreManager featureAPurchased]) // if feature 1 is purchased{feature1Button.hidden = YES; // hiding the Buy Feature 1 buttonseeFeature1Button.hidden = NO; // showing the Switch To Feature 1 button}if ([MKStoreManager featureBPurchased]) // if feature 2 is purchased{feature2Button.hidden = YES; // hiding the Buy Feature 2 buttonseeFeature2Button.hidden = NO; // showing the Switch To Feature 1 button}}
MKStoreKit uses NSUserDefaults for saving information on whether a product is purchased, so when the application is uninstalled, the information is lost. However, the user would not have to pay for the same feature twice as StoreKit would open access to the feature for free.
Now you need to implement the Purchase methods, which are bound to the TouchUpInside event by the following buttons:
-(IBAction)feature1ButtonPressed{[self showLockView]; // letting the user know about the download being done[[MKStoreManager sharedManager] buyFeatureA]; // sending the Buy Feature 1 message to the store}-(IBAction)feature2ButtonPressed{[self showLockView]; // letting the user know about the download being done[[MKStoreManager sharedManager] buyFeatureB]; // sending the Buy Feature 2 message to the store}
Here's how I implemented the MKStoreKitDelegate delegate methods:
// feature 1 is purchased- (void)productAPurchased{[self hideLockView]; // hiding the downloadfeature1Button.hidden = YES; // hiding the Buy buttonseeFeature1Button.hidden = NO; // showing the Switch button}// feature 2 is purchased- (void)productBPurchased{[self hideLockView]; // hiding the downloadfeature2Button.hidden = YES; // hiding the Buy buttonseeFeature2Button.hidden = NO; // showing the Switch button}// the purchase either failed or was cancelled- (void)failed{[self hideLockView]; // hiding the download}
I implemented the new features as separate UIView classes controlled by UIViewController, and the switchover to those features, using UINavigationController:
// switch to feature 1-(IBAction)seeFeature1{[self.navigationController pushViewController:feature1ViewController animated:YES];}// switch to feature 2-(IBAction)seeFeature2{[self.navigationController pushViewController:feature2ViewController animated:YES];}
When interacting with the store, you may also check its availability:
if ([SKPaymentQueue canMakePayments]){... // Show the store to the user}else{... // Tell the user that Purchases are unavailable}
As you can see, everything is rather simple. All that is remaining is to compile the code and to run some tests. :)
Step 7. Testing
To test In-App Purchases you need to compile, install and run the application. Please remember the following about the testing:
- Purchases must be tested on an actual device.
- Before you can start the test, quit iTunes on your iPhone: Settings -> Store -> Sign Out.
- When your test is running, you will see [Environment: sandbox] in the messages containing the offer to buy a feature, so that you know that's a test mode.
- You must use test accounts only (see Step 5) for your testing.
Test case: InAppPurchasesExample
As a result, I've got an application that can unlock two additional windows. You can use this application as an example for implementing your own In-App Purchase projects.


Hopefully, this article was useful for you. If you have any questions, please feel free to ask me — I'll be happy to answer.
Thứ Năm, 30 tháng 9, 2010
How to handle long tap even
This is my simple method to do this on touch began u have to get the point and store it as first and second that should be equal for future compare and then start timer, when the timer ends u have to compare first and second, if it equals then its long press!
And if the touches ends or moved u have to break timer as well as store the point as second point!!
some more detailed
And if the touches ends or moved u have to break timer as well as store the point as second point!!
some more detailed
Code:
- (void)touchesBegan:(NSSet *)touches withEvent:(UIEvent *)event{

UITouch *touch = [touches anyObject];
firstPoint=secondPoint = [touch locationInView:self];
//start timer
}

-(void)onTimerCall{

//check first and second point for equals if it equals its long tap

}

- (void)touchesEnded:(NSSet *)touches withEvent:(UIEvent *)event{

UITouch *touch = [touches anyObject];
secondPoint = [touch locationInView:self];

}

- (void)touchesMoved:(NSSet *)touches withEvent:(UIEvent *)event{

UITouch *touch = [touches anyObject];
secondPoint = [touch locationInView:self];
} Thứ Ba, 31 tháng 8, 2010
SQLite-Adding,Deleting,Updating
SQLite Tutorial - Adding data
Inserting data into SQLite database is a breeze with iPhone applications. In the third part of SQLite tutorials, I will show how to insert data into the database.
Introduction
Adding data into the database is very simple using the SQLite library, although there are some tweaks we have to perform if we want the application to behave in a certain way. This tutorial picks up its source code from the last tutorial in this series. This is how the "AddView" looks like
 The work flow is as following, a user will click on the "Add" button on the left hand bar button item and the "AddView" will be presented to him. The user will enter the coffee name and price and click on "Save" on the navigation item on the right hand side to save it. Internally, it will call "save_Clicked" method which will create a "Coffee" object and set all the right properties. We then call "add_Coffee" method on "SQLAppDelegate" which will call "add_Coffee" method on the "Coffee" class and then it will add the object to the array. We then dismiss the add view controller and reload data on the table view in "viewWillAppear" method implemented in "RootViewController.m".
Creating the addCoffee Method
First thing we do is create the addCoffee method in the Coffee class which is responsible for inserting data in the database.
This is how the header file looks like (Complete code not shown)
and the method is implemented in Coffee.m file
The "add_Stmt" is declared as static sqlite3_stmt variable. It is finalized in finalizeStatements and this is how the code looks like
Coming back to addCoffee method, "add_Stmt" is built using the appropriate insert SQL code. To bind the coffee name the following method sqlite3_bind_text is used and sqlite3_bind_double is used to bind the price variable to the insert statement. Since the method only accepts a value of datatype double, we send doubleValue message to the receiver. Execute the statement using sqlite_step method and if it returns SQLITE_DONE then the row was successfully added to the database. We still do not have the primary key for the row which was inserted, which we can get by calling sqlite3_last_insert_rowid method and passing the database object. The "rowid" is only returned on column of type INTEGER PRIMARY KEY.
After adding the data in the database, we have to add the coffee object to the coffeeArray declared in SQLAppDelegate class. To do this we will declare a method called "add_Coffee" which will take a parameter of type Coffee and this method is called from "save_Clicked" method, which is called when the user clicks on the save button.
This is how the header file changes (Full code not shown)
addCoffee is implemented in SQLAppDelegate.m file and this is the code listing
The first line calls the "addCoffee" method on the coffee object which we just created. The second line adds the object in the array.
Now we have to work with the Add View and its associated view controller.
Adding new UIView
Create a new view using the Interface Builder, I have named the view "AddView". Add two labels and two text boxes as shown in the figure below. For the text fields, Capitalize is set to "Words", Return Key is set to "Done" and set the Placeholder as "Coffee Name" and "Price" for the two respective text fields. You would set the properties in "Text Field Attributes" (Tools -> Inspector) using IB. Open "Connections Inspector" and create a connection from the delegate property to "File's Owner" object, do the same for both the text boxes. I find it hard to explain what goes in IB, so here is a screen shot of how it should look like. The "Text Field Connections" applies to both the text boxes.


Creating a UIViewController
Create a new view controller (using Xcode), the name of my file is "AddViewController". Create two variables of type UITextField with "IBOutlet" attribute so the variables show up in IB and create two methods called "save_Clicked" and "cancel_Clicked". This is how the header file should look like
Now that we have defined "AddViewController" set the File's Owner class as "AddViewController" in "Controller Identity", below is a screen shot of that.
 Also link the text fields declared in the view controller to the objects on the "AddView", below is a screen shot of that
 We are done with using Interface builder, feels good now that we can concentrate on code.
We now have to add two buttons "Cancel" and "Save" on the "UINavigationItem" of the "AddView". Let us do this in "viewDidLoad" method and this how the code looks like
Everything is self explanatory, we set the title, add two buttons and set the background of the view by passing groupTableViewBackgroundColor message to UIColor.
Since the view has only two text fields, it will be easier if the keypad is presented to the user when the view is loaded. Lets do this in "viewWillAppear" method and this is how the code looks like
Here we always set the text property of the text fields to empty string and we make the keypad show up for the coffeeName text field by passing becomeFirstResponder message.
Since the user can click "Done" the keyboard should be hidden and the method which gets called is textFieldShouldReturn and this is how the code looks like
Please note that, I send "resignFirstResponder" message to the text field without finding out which textbox should be hidden. I do this because, the actual save happens in "save_clicked" method.
Before we look at "save_Clicked" method, this is how "cancel_Clicked" method looks like
and this is how the "save_Clicked" method looks like
We create a new coffee class and set all the properties, isDetailViewHydrated is set as YES because all the data is in memory and isDirty is set as NO because the row will be inserted in the database after setting all the properties. The view is dismissed by passing "dismissModalViewControllerAnimated" message to the receiver.
We still have to add the "Add" button to the "RootViewController" and add the code to show the "AddView". This is how the header file changes for "RootViewController"
Do not forget to import "AddViewController.h" in "RootViewController.m" file. The "Add" button is added in the "viewDidLoad" method and this is how the code changes
When "Add" is clicked "add_Clicked" method is called and this is how the code looks like
The reason we present the "AddView" using "addNavigationController" because when we want a custom UINavigationItem to show up on the AddView and that is why we initialize "addNavigationController" with "avController" and present it using "presentModalViewController".
Run your application to insert data in the database.
There is however a problem with the design here, a User can click on Edit and nothing restricts him/her from clicking the add button. The code below fixes the issue
The method setEditing is called when the edit button is clicked. We send the same message to the parent class and the tableview, also disable or enable the leftBarButtonItem if the tableview is in edit mode.
Conclusion
As we can see inserting data in SQLite databases is very easy to do.
Happy Programming,
iPhone SDK Articles
Attachments
Suggested Readings
Introduction
Adding data into the database is very simple using the SQLite library, although there are some tweaks we have to perform if we want the application to behave in a certain way. This tutorial picks up its source code from the last tutorial in this series. This is how the "AddView" looks like
The work flow is as following, a user will click on the "Add" button on the left hand bar button item and the "AddView" will be presented to him. The user will enter the coffee name and price and click on "Save" on the navigation item on the right hand side to save it. Internally, it will call "save_Clicked" method which will create a "Coffee" object and set all the right properties. We then call "add_Coffee" method on "SQLAppDelegate" which will call "add_Coffee" method on the "Coffee" class and then it will add the object to the array. We then dismiss the add view controller and reload data on the table view in "viewWillAppear" method implemented in "RootViewController.m".Creating the addCoffee Method
First thing we do is create the addCoffee method in the Coffee class which is responsible for inserting data in the database.
This is how the header file looks like (Complete code not shown)
- (void) addCoffee;and the method is implemented in Coffee.m file
- (void) addCoffee {

if(addStmt == nil) {
const char *sql = "insert into Coffee(CoffeeName, Price) Values(?, ?)";
if(sqlite3_prepare_v2(database, sql, -1, &addStmt, NULL) != SQLITE_OK)
NSAssert1(0, @"Error while creating add statement. '%s'", sqlite3_errmsg(database));
}

sqlite3_bind_text(addStmt, 1, [coffeeName UTF8String], -1, SQLITE_TRANSIENT);
sqlite3_bind_double(addStmt, 2, [price doubleValue]);

if(SQLITE_DONE != sqlite3_step(addStmt))
NSAssert1(0, @"Error while inserting data. '%s'", sqlite3_errmsg(database));
else
//SQLite provides a method to get the last primary key inserted by using sqlite3_last_insert_rowid
coffeeID = sqlite3_last_insert_rowid(database);

//Reset the add statement.
sqlite3_reset(addStmt);
}
The "add_Stmt" is declared as static sqlite3_stmt variable. It is finalized in finalizeStatements and this is how the code looks like
//Complete code listing not shown
#import "Coffee.h"

static sqlite3 *database = nil;
static sqlite3_stmt *deleteStmt = nil;
static sqlite3_stmt *addStmt = nil;

@implementation Coffee
...
+ (void) finalizeStatements {

if(database) sqlite3_close(database);
if(deleteStmt) sqlite3_finalize(deleteStmt);
if(addStmt) sqlite3_finalize(addStmt);
}
Coming back to addCoffee method, "add_Stmt" is built using the appropriate insert SQL code. To bind the coffee name the following method sqlite3_bind_text is used and sqlite3_bind_double is used to bind the price variable to the insert statement. Since the method only accepts a value of datatype double, we send doubleValue message to the receiver. Execute the statement using sqlite_step method and if it returns SQLITE_DONE then the row was successfully added to the database. We still do not have the primary key for the row which was inserted, which we can get by calling sqlite3_last_insert_rowid method and passing the database object. The "rowid" is only returned on column of type INTEGER PRIMARY KEY.
After adding the data in the database, we have to add the coffee object to the coffeeArray declared in SQLAppDelegate class. To do this we will declare a method called "add_Coffee" which will take a parameter of type Coffee and this method is called from "save_Clicked" method, which is called when the user clicks on the save button.
This is how the header file changes (Full code not shown)
//FileName: SQLAppDelegate.h
- (void) addCoffee:(Coffee *)coffeeObj;
...
addCoffee is implemented in SQLAppDelegate.m file and this is the code listing
- (void) addCoffee:(Coffee *)coffeeObj {

//Add it to the database.
[coffeeObj addCoffee];

//Add it to the coffee array.
[coffeeArray addObject:coffeeObj];
}
The first line calls the "addCoffee" method on the coffee object which we just created. The second line adds the object in the array.
Now we have to work with the Add View and its associated view controller.
Adding new UIView
Create a new view using the Interface Builder, I have named the view "AddView". Add two labels and two text boxes as shown in the figure below. For the text fields, Capitalize is set to "Words", Return Key is set to "Done" and set the Placeholder as "Coffee Name" and "Price" for the two respective text fields. You would set the properties in "Text Field Attributes" (Tools -> Inspector) using IB. Open "Connections Inspector" and create a connection from the delegate property to "File's Owner" object, do the same for both the text boxes. I find it hard to explain what goes in IB, so here is a screen shot of how it should look like. The "Text Field Connections" applies to both the text boxes.
Creating a UIViewController
Create a new view controller (using Xcode), the name of my file is "AddViewController". Create two variables of type UITextField with "IBOutlet" attribute so the variables show up in IB and create two methods called "save_Clicked" and "cancel_Clicked". This is how the header file should look like
#import

@class Coffee;

@interface AddViewController : UIViewController {

IBOutlet UITextField *txtCoffeeName;
IBOutlet UITextField *txtPrice;
}

@end
Now that we have defined "AddViewController" set the File's Owner class as "AddViewController" in "Controller Identity", below is a screen shot of that.
Also link the text fields declared in the view controller to the objects on the "AddView", below is a screen shot of thatWe are done with using Interface builder, feels good now that we can concentrate on code.We now have to add two buttons "Cancel" and "Save" on the "UINavigationItem" of the "AddView". Let us do this in "viewDidLoad" method and this how the code looks like
- (void)viewDidLoad {
[super viewDidLoad];

self.title = @"Add Coffee";

self.navigationItem.leftBarButtonItem = [[[UIBarButtonItem alloc]
  initWithBarButtonSystemItem:UIBarButtonSystemItemCancel
   target:self action:@selector(cancel_Clicked:)] autorelease];

self.navigationItem.rightBarButtonItem = [[[UIBarButtonItem alloc]
   initWithBarButtonSystemItem:UIBarButtonSystemItemSave
   target:self action:@selector(save_Clicked:)] autorelease];

self.view.backgroundColor = [UIColor groupTableViewBackgroundColor];
}
Everything is self explanatory, we set the title, add two buttons and set the background of the view by passing groupTableViewBackgroundColor message to UIColor.
Since the view has only two text fields, it will be easier if the keypad is presented to the user when the view is loaded. Lets do this in "viewWillAppear" method and this is how the code looks like
- (void) viewWillAppear:(BOOL)animated {
[super viewWillAppear:animated];

//Set the textboxes to empty string.
txtCoffeeName.text = @"";
txtPrice.text = @"";

//Make the coffe name textfield to be the first responder.
[txtCoffeeName becomeFirstResponder];
}
Here we always set the text property of the text fields to empty string and we make the keypad show up for the coffeeName text field by passing becomeFirstResponder message.
Since the user can click "Done" the keyboard should be hidden and the method which gets called is textFieldShouldReturn and this is how the code looks like
- (BOOL)textFieldShouldReturn:(UITextField *)theTextField {

[theTextField resignFirstResponder];
return YES;
}
Please note that, I send "resignFirstResponder" message to the text field without finding out which textbox should be hidden. I do this because, the actual save happens in "save_clicked" method.
Before we look at "save_Clicked" method, this is how "cancel_Clicked" method looks like
- (void) cancel_Clicked:(id)sender {

//Dismiss the controller.
[self.navigationController dismissModalViewControllerAnimated:YES];
}
and this is how the "save_Clicked" method looks like
- (void) save_Clicked:(id)sender {

SQLAppDelegate *appDelegate = (SQLAppDelegate *)[[UIApplication sharedApplication] delegate];

//Create a Coffee Object.
Coffee *coffeeObj = [[Coffee alloc] initWithPrimaryKey:0];
coffeeObj.coffeeName = txtCoffeeName.text;
NSDecimalNumber *temp = [[NSDecimalNumber alloc] initWithString:txtPrice.text];
coffeeObj.price = temp;
[temp release];
coffeeObj.isDirty = NO;
coffeeObj.isDetailViewHydrated = YES;

//Add the object
[appDelegate addCoffee:coffeeObj];

//Dismiss the controller.
[self.navigationController dismissModalViewControllerAnimated:YES];
}
We create a new coffee class and set all the properties, isDetailViewHydrated is set as YES because all the data is in memory and isDirty is set as NO because the row will be inserted in the database after setting all the properties. The view is dismissed by passing "dismissModalViewControllerAnimated" message to the receiver.
We still have to add the "Add" button to the "RootViewController" and add the code to show the "AddView". This is how the header file changes for "RootViewController"
#import

@class Coffee, AddViewController;

@interface RootViewController : UITableViewController {

SQLAppDelegate *appDelegate;
AddViewController *avController;
UINavigationController *addNavigationController;
}

@end
Do not forget to import "AddViewController.h" in "RootViewController.m" file. The "Add" button is added in the "viewDidLoad" method and this is how the code changes
- (void)viewDidLoad {
[super viewDidLoad];

self.navigationItem.rightBarButtonItem = self.editButtonItem;

self.navigationItem.leftBarButtonItem = [[UIBarButtonItem alloc]
 initWithBarButtonSystemItem:UIBarButtonSystemItemAdd
 target:self action:@selector(add_Clicked:)];

appDelegate = (SQLAppDelegate *)[[UIApplication sharedApplication] delegate];

self.title = @"Coffee List";
}
When "Add" is clicked "add_Clicked" method is called and this is how the code looks like
- (void) add_Clicked:(id)sender {

if(avController == nil)
avController = [[AddViewController alloc] initWithNibName:@"AddView" bundle:nil];

if(addNavigationController == nil)
addNavigationController = [[UINavigationController alloc] initWithRootViewController:avController];

[self.navigationController presentModalViewController:addNavigationController animated:YES];
}
The reason we present the "AddView" using "addNavigationController" because when we want a custom UINavigationItem to show up on the AddView and that is why we initialize "addNavigationController" with "avController" and present it using "presentModalViewController".
Run your application to insert data in the database.
There is however a problem with the design here, a User can click on Edit and nothing restricts him/her from clicking the add button. The code below fixes the issue
- (void)setEditing:(BOOL)editing animated:(BOOL)animated {

[super setEditing:editing animated:animated];
  [self.tableView setEditing:editing animated:YES];

//Do not let the user add if the app is in edit mode.
if(editing)
 self.navigationItem.leftBarButtonItem.enabled = NO;
else
 self.navigationItem.leftBarButtonItem.enabled = YES;
}
The method setEditing is called when the edit button is clicked. We send the same message to the parent class and the tableview, also disable or enable the leftBarButtonItem if the tableview is in edit mode.
Conclusion
As we can see inserting data in SQLite databases is very easy to do.
Happy Programming,
iPhone SDK Articles
Attachments
Suggested Readings
- SQLite Tutorial - Deleting data
- SQLite Tutorial - Inserting data into SQLite database
- SQLite Tutorial - Saving images in the SQLite database
Đăng ký:
Bài đăng (Atom)